Creating Title Entry Pages
When a title has been gathered and analysis and processing have
been completed you can then create a Title Entry Page (if it is a new title) or
add the new instance to the existing Title Entry Page.
Procedures covered in this section include:
Creating a New Title Entry Page
(TEP)
Before you can create a TEP, the processing status for the
archived instance must be set to: Current Status "Archived". You should
also have finished the analysis of the title and the Analysis Status
should be set to "Completed". You begin creating a TEP from the Title -
Management screen.
To start creating a TEP:
- Click on the Archive link on the Menu Bar
- If there is no existing TEP for the title a message will appear
asking if you would like to create one. Click on the Create button. You
will now be at the Title - Archive screen
- Click on the Tep tab. This opens the first TEP data
entry screen
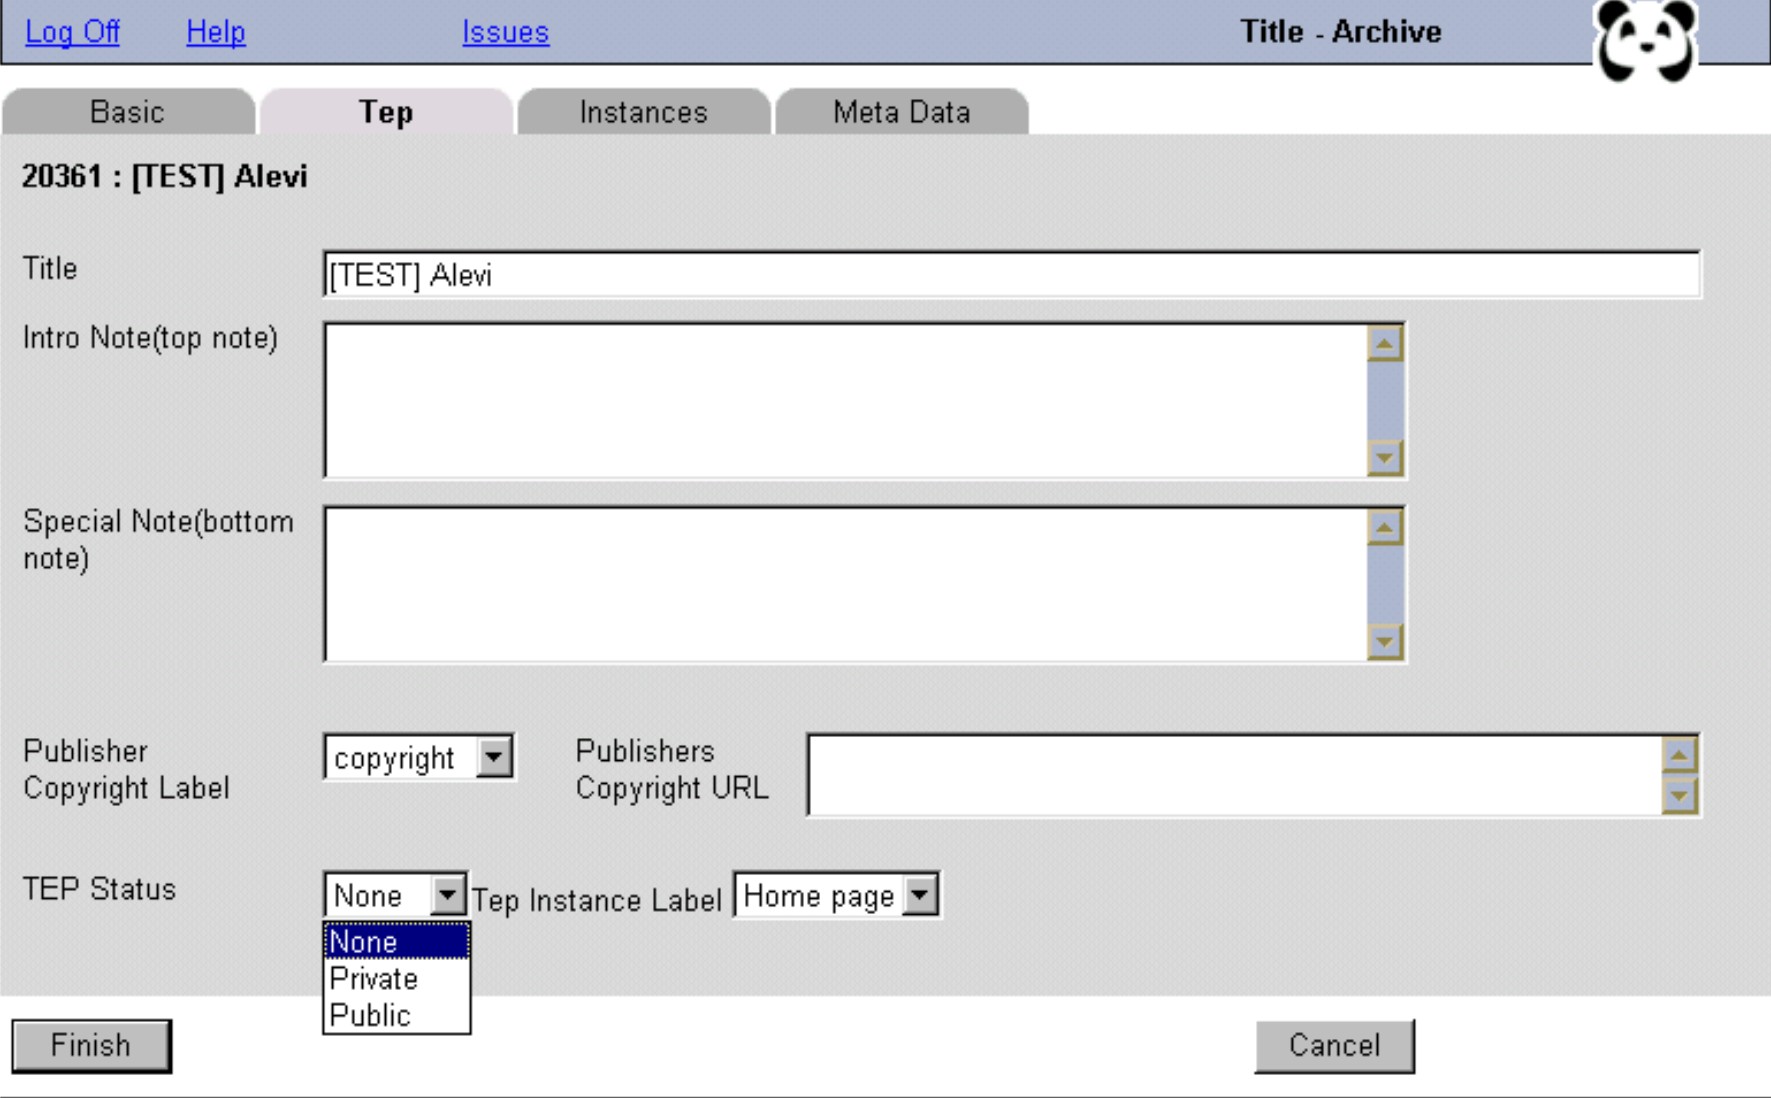
On this screen you should:
- Make sure the title in the title field is how you want it to
display on the TEP. NB: This title can be different from the title as it
appears in the main record on PANDAS. Changing the title here will not
alter the main record for the title on PANDAS.
- If required, add a note in the Intro Note (top note)
field, e.g. for serial titles this would be the message to say that some
issues accessed through a Home Page may be incomplete etc. NB: The Into Note
(top note) is not the standard note about gathering frequency and status;
that note is automatically generated based on the status set in the title
record.
- If required, add a note in the Special Note (bottom
note) field, e.g. this could be a special note associated with the
copyright statement.
- If there is a publisher's copyright statement include the URL
for the archived version in the Publishers Copyright URL box.
- If the publisher's statement is a disclaimer rather than a
copyright statement select "disclaimer" from the Publisher Copyright
Label drop-down box.
- Select the appropriate status from the TEP Status
drop-down box. This will normally be "Public" which will allow the TEP to be
displayed publicly. If the TEP is not to be made public use "Private".
- Select the appropriate label from the TEP Instance Label
drop-down box. This is the hypertext link label that appears next to the
archived instance on the TEP. The options are Home Page, Title and Site.
When you have completed the details on the the Tep tab
click on the Instances tab. You will see this screen:
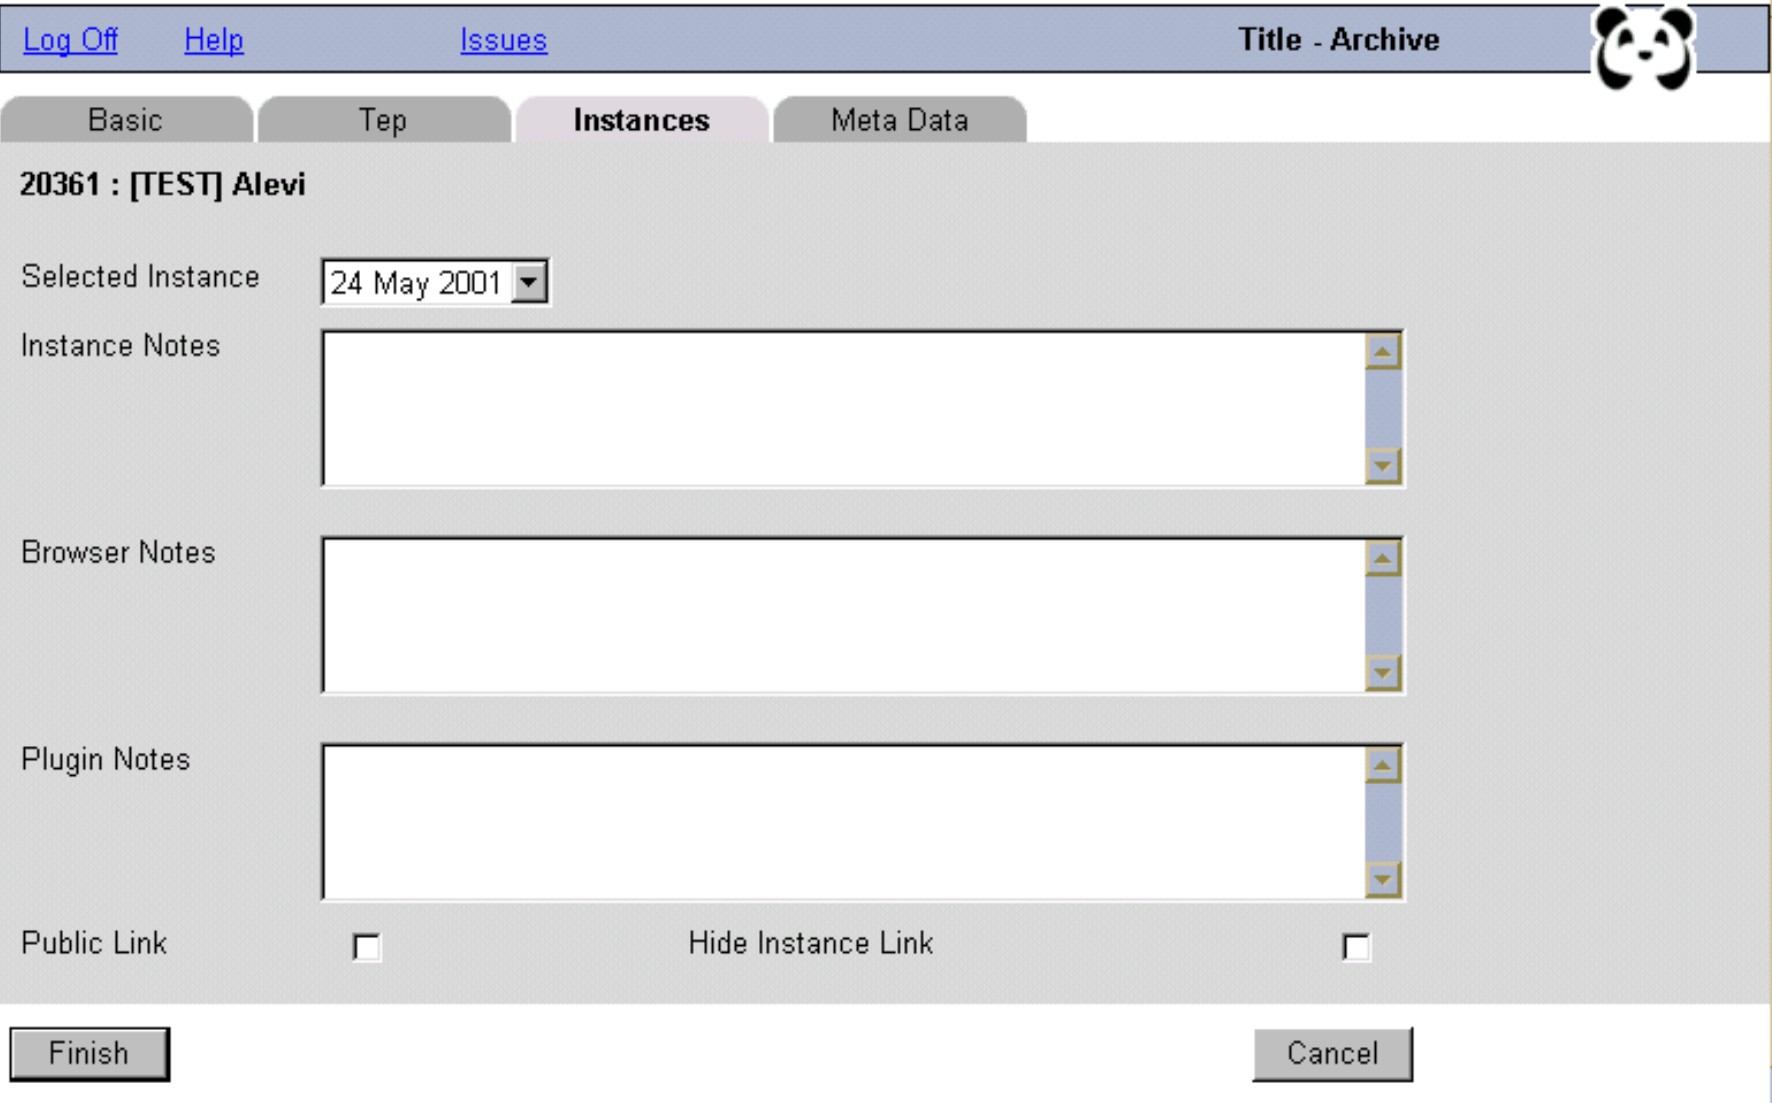
On this screen you should:
- Make sure the instance indicated in the Selected
Instance box is the one you wish to work on. You can choose a particular
instance by selecting from the Selected Instance drop-down box
- If required, add notes in the Instance Notes box. These
are notes that are specific to the particular archived instance. Adding an
instance note will add a button next to the instance link on the TEP which,
when clicked, will open a box displaying the note
- If required, add browser and plugin notes in the Browser
Notes and Plugin Notes boxes. These notes will add another button
next to the instance link on the TEP which, when clicked, will open a box
displaying the notes
- Click on the Public Link tick box to make the instance
display on the TEP. If you do not want the instance to display on the TEP then
you should click on the Hide Instance Link tick box and make sure the
Public Link tick box is empty
- If you are creating a TEP for a serial title see instructions
for Creating Serial Issues
- If you are creating a TEP for a monograph or integrating title
click the Finish button
- You will be taken back to the Title - Management screen
where you can view the newly created TEP by clicking on the PI link. NB:
You should always check the TEP to ensure that there are no errors and all
links work. If there is an invalid status/standing this will appear as a
message highlighted in red. If you need to re-edit the TEP you must click on
the Archive link on the Menu Bar to go back to the Title -
Archive screen
Creating Serial Issues
Before creating serial issues you must have created the basic TEP
details and indicated whether or not you want the instance(s) made public or
hidden. If you have clicked on the Finish button after creating the
basic TEP and instance information and are looking at the Title -
Management screen, you will need to click on the Archive link on the
Menu Bar to return to the Title - Archive screen.
To create serial issues:
- Click the Issues link on the Menu Bar. A message will
appear asking you to save the TEP information. (NB: You will not get this
message if you have already clicked the Finish button when creating the
TEP information.)
- Click the Save button. A message will appear saying
there are no issues for this archived instance
- Click the Add button
- You will now be taken to the Title - Archive screen
Issues tab where you can begin adding issues
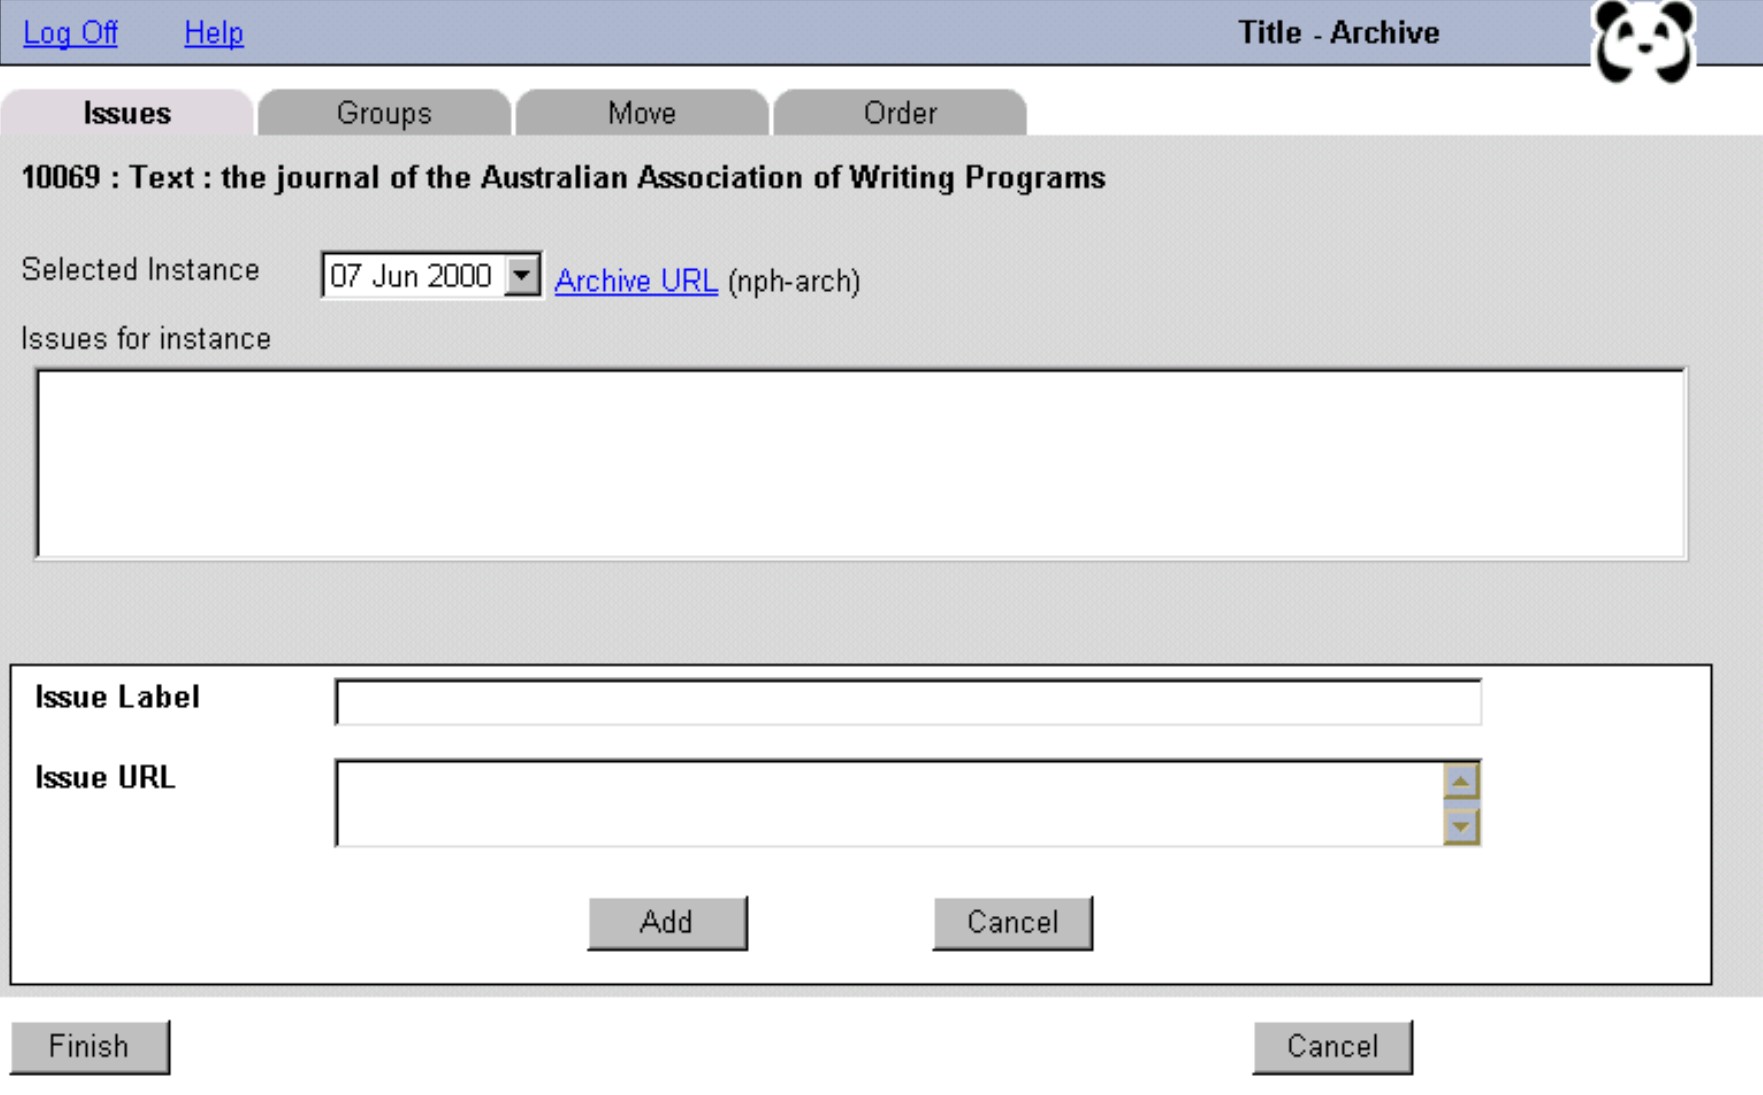
On this screen you should:
- Check that the instance in the Selected Instance
drop-down box is the instance to the issue you wish to add belongs. If is is
not, select the instance you want from the drop-down box
- Enter the issue details in the Issue Label box, e.g.
Vol. 1, no. 1 (Jan. 2001)
- Enter the archived URL for the issue in the Issue URL
box. (NB: Click on the link to the Archive URL to open a browser window with
the archived instance so that you can cut and paste the issue URLs)
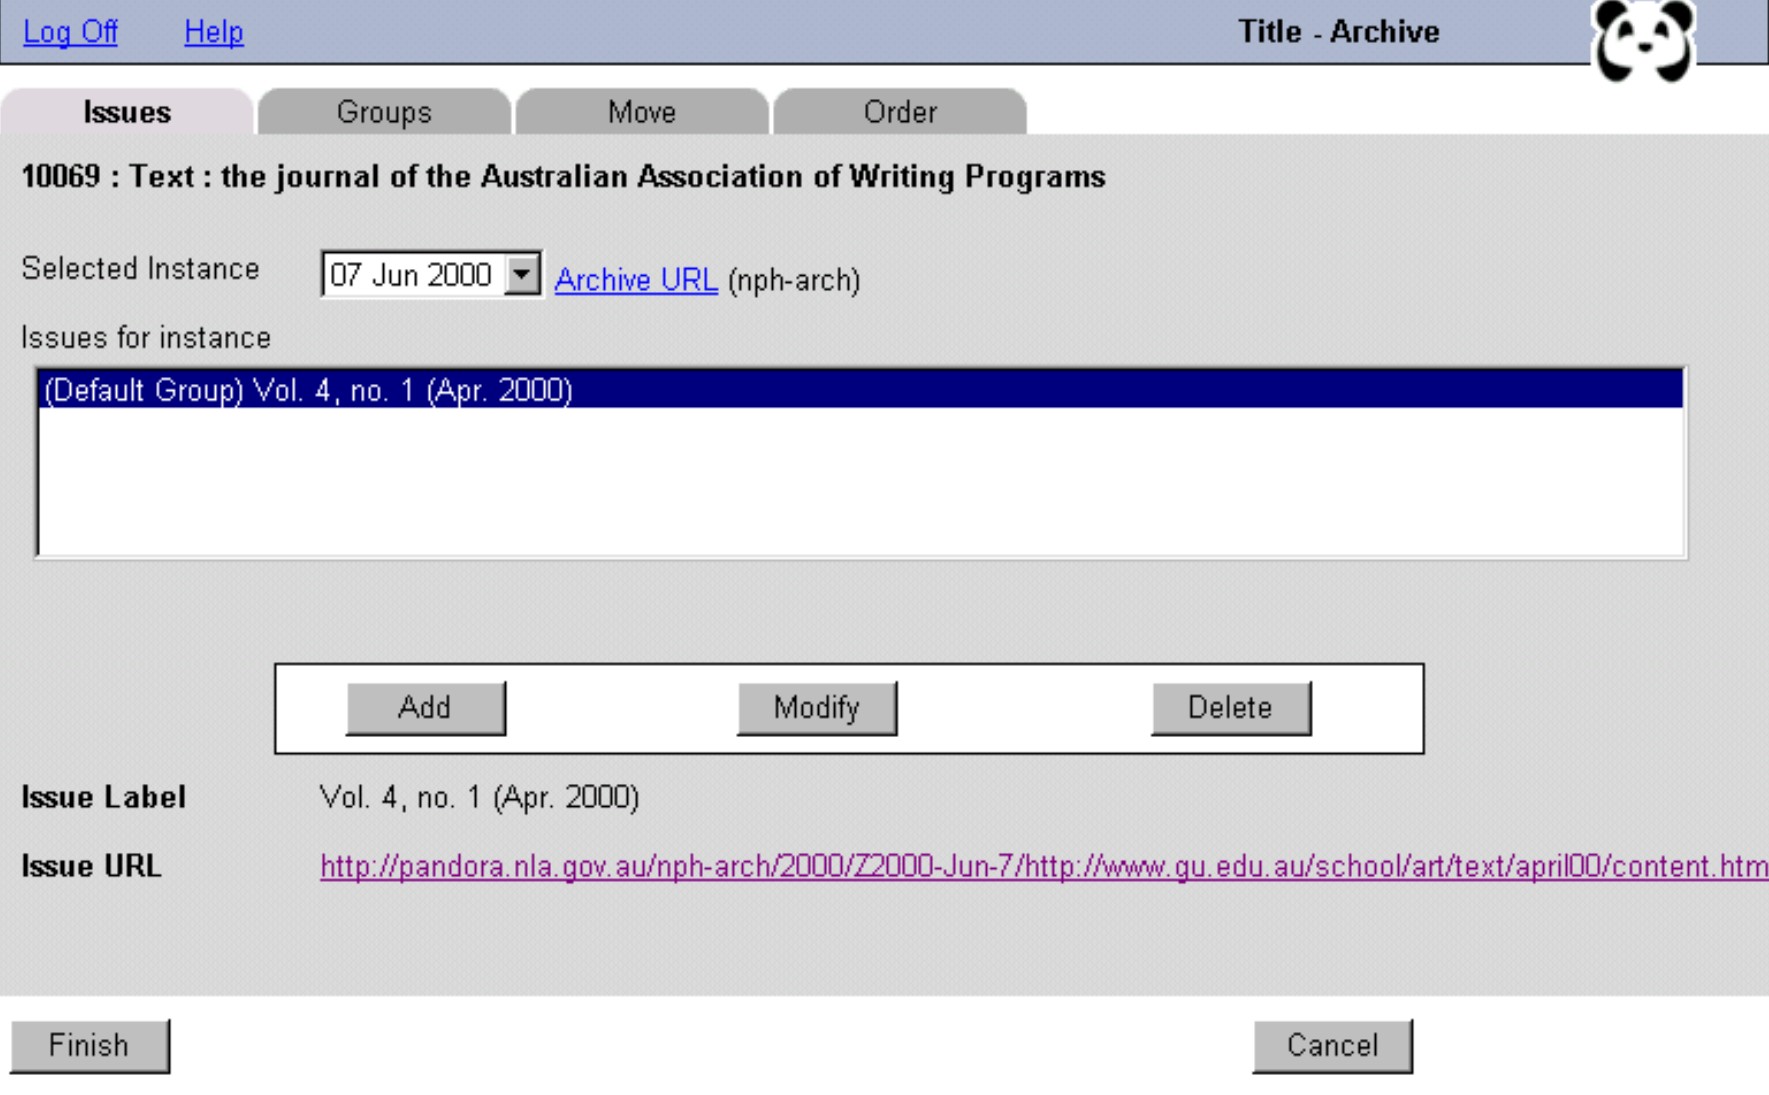
- Click the Add button. The screen that now displays shows
you that the issue has been added to the "Default Group" (see Creating Issue Groups for instructions on moving issues to
groups). You can modify or delete the issue or add a new issue.
- To add another issue Click on the Add button and repeat
steps 1 to 4 above
- Click the Finish button when you have added all the
issues to go back to the Title - Management screen.
Modifying Issue Details
To modify issue details:
- Go to the Title - Archive screen and click the
Issues link on the Menu Bar
- From the Selected Instance drop-down box select the
instance in which the issue you want to modify belongs
- Highlight the issue you want in the Issues for instance
box
- Click the Modify button
- You can now edit the details appearing in the Issue
Label and Issue URL boxes
- Click the Modify button again
- Repeat steps 2 to 6 to edit other issues
- Click the Finish button when you have finished all your
modifications
Deleting Issue Details
To delete issue details:
- Go to the Title - Archive screen and click the
Issues link on the Menu Bar
- From the Selected Instance drop-down box select the
instance in which the issue you want to delete belongs
- Highlight the issue you want in the Issues for instance
box
- Click the Delete button. A message will appear asking
you to confirm that you want to delete the issue details
- Click the Delete button again
- Repeat steps 2 to 5 to delete other issue details
- Click the Finish button when you have finished all your
deletions
Creating Issue Groups
You arrange serial issues into groups on the TEP. To do this you
firstly need to create the groups you want then you can move issues to the
groups you have created.
You should have already added the issue details.
- Go to the Title - Archive screen and click the
Issues link on the Menu Bar
- Click on the Groups tab to display the Groups
screen
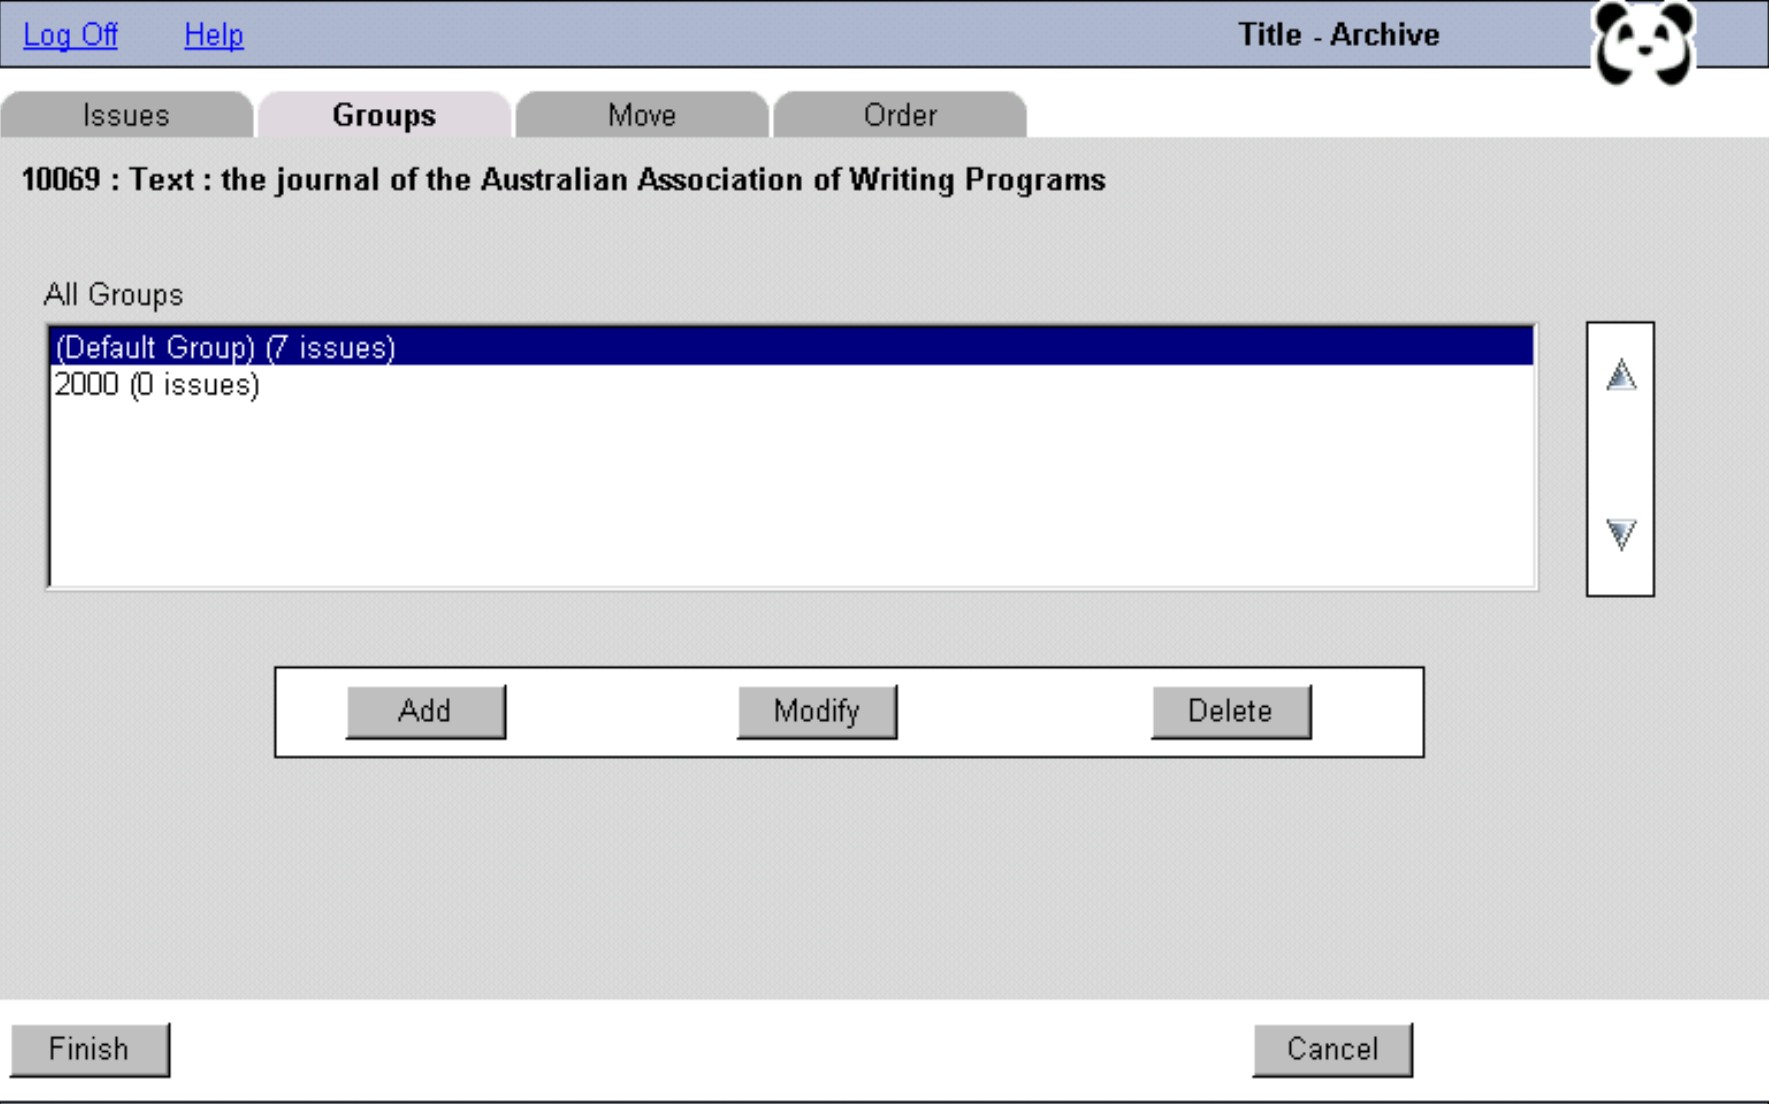
To create a group:
- Click the Add button
- Enter the label you want to give the group in the Group
Title box
- Click the Add button again
- The new group will now display in the All Groups
box
- Repeat steps 3 to 5 to create more groups
- You can now move issues to groups (see
Moving Issues to Groups),
modify or delete group
labels (NB: you cannot delete or modify the "Default Group")
- If you have finished creating groups and do not want to move
issues to groups click the Finish button
Changing the Order of
Groups
You can change the order of the groups by highlighting a group
label in the All Groups box and clicking on the arrows to the right of
the All Groups box.
Modifying Group Labels
To modify group label details:
- Go to the Title - Archive screen and click the
Issues link on the Menu Bar
- Click on the Groups tab
- Highlight the group label you want to modify in the All
Groups box
- Click the Modify button
- You can now edit the details appearing in the Group
Title box
- Click the Modify button again
- Repeat steps 2 to 6 to edit other group label (NB: you cannot
modify the "Default" group
- Click the Finish button when you have finished all your
modifications
Deleting Group Labels
To delete group labels:
- Go to the Title - Archive screen and click the
Issues link on the Menu Bar
- Click on the Groups tab
- Highlight the group label you want to modify in the All
Groups box
- Click the Delete button. A message will appear requiring
you to confirm that you want to delete the group and telling you that issues in
this group will be moved to the "Default Group"
- Click the Delete button again
- Repeat steps 2 to 5 to delete other group labels
- Click the Finish button when you have finished all your
deletions
Moving Issues to Groups
Once you have created a group label you are able to organise
issues under those groups.
- Go to the Title - Archive screen and click the
Issues link on the Menu Bar
- Click on the Move tab to display the Move screen

To move issues to groups:
- Highlight the issue or issues you want to move in the box
displaying all issues (NB: This display also indicates to which group issues
currently belong)
- Select the group you wish to move the issue to from the Move
selected issues to group drop-down box
- Click the Move button and the screen will be refreshed
showing the changes you have made
- Click the Finish to go back to the Title -
Management screen
NB: You can move more than one issue to a particular group at the
same time by highlighting all the issues you want to move. Hold down the Ctrl
key and click on each issue; or if you want to select a consecutive range of
issues range hold down the Shift key and click on the first and last issues of
the range.
Ordering Issues
You may need to change the order in which issues appear.
- Go to the Title - Archive screen and click the
Issues link on the Menu Bar
- Click on the Order tab to display the Order screen

If the serial issues are not organised in groups all issues will
be visible in the display box. If the issues are in groups you can only move
the issues up and down within the group. You can view the issues within a
specific group by selecting the group from the Select Group drop-down
box.
- Select the group in which you want to move issue from the
Select Group drop-down box
- Highlight the issue you want to move (NB: Unlike moving issues
to a group, you can only move one issue at a time to re-order the list)
- Click on the up or down arrow that appears to the right side of
the display box. Clicking the up and down arrows will move the issue up or down
by one line for each click.
- Repeat steps to re-order other issues
- Click the Finish button to return to the Title -
Management screen
INSECT Title Entry Pages
Title Entry Pages for INSECTs are generated automatically by the
system. The TEP display notes and subgroups labels are recorded in the record
for the INSECT (see instructions for Creating
INSECT Records).
To include a title in an INSECT collection TEP you must have
already attached an INSECT (and INSECT subgroup if applicable) on the Title
- Edit screen (see Creating and Editing
Title Records). To add the title to the INSECT TEP follow the basic
procedures for creating TEPs including making the archived instance public or
hidden, as appropriate. You can move a title to a different subgroup by
changing the selected subgroup on the Title - Edit screen (see
Creating and Editing Title Records). You
cannot re-order titles within a subgroup.
Former Titles on Title Entry
Pages
When an integrating site changes its title the former title can be
made to appear in parentheses after the new title on the TEP. To create this
"formerly" title on the TEP you must create the change of title at the
History tab on the Title - Edit screen (see
Title Changes for instruction). When
you have created the link you will then need to go to the the Tep tab on
the Title - Archive screen and change the TEP display title to the new
(later) title. You should not include the former title when doing this as that
will be generated automatically by PANDAS. |
![[Pandora Archive logo]](http://pandora.nla.gov.au/nla/pandora/pandora6.gif)
![[Pandora Archive logo]](http://pandora.nla.gov.au/nla/pandora/pandora6.gif)
![[National Library of Australia]](http://pandora.nla.gov.au/nla/pandora/logo.gif)